Tutorial # 1 - Creating Realistic Stone (Version 1)
- Jack's on the Net

- Jan 5, 2020
- 4 min read
Updated: May 23, 2020
Written by Sarah-Anne
Ever wondered why some stone terrain looks more realistic than others? Look no further for techniques to improve your own 'masonry' skills! This is most effective when you have a large man-made structure such as a stone wall or building, and want a more uniform but otherwise realistic result. If you are looking for an organic free-form result that would be more appropriate in a non-urban setting, then I suggest you check out our second stone tutorial here!

Materials Required:
foamcore sheets (with paper backing removed), or foam insulation
Mod Podge, tinted with black acrylic paint
acrylic paint
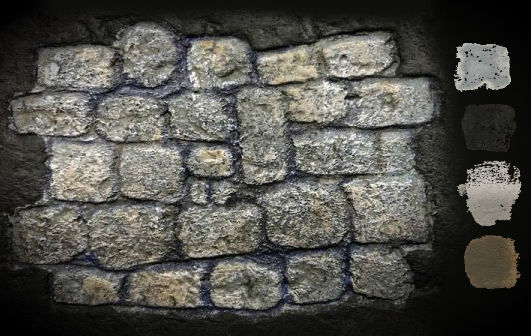
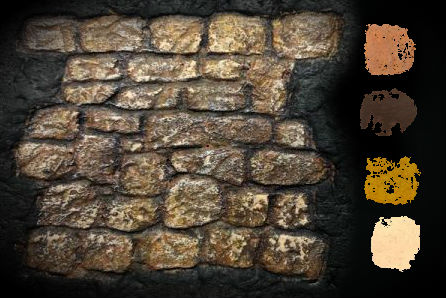
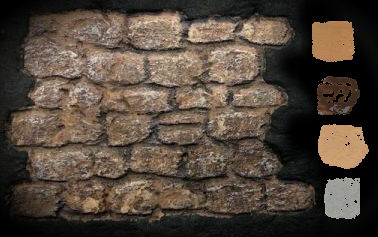
your base stone colour, medium shade
stone accent colours, one darker, one lighter than medium base colour
stone accent colour, contrasting/complementary to medium base colour
highlighting colour (off-white)
black or brown acrylic ink wash
matte sealant
PVA glue (optional, for adding vines or plant overgrowth)
assorted flocking (optional, for adding vines or plant overgrowth)
Tools Required:
assorted sized flat-head paint brushes
ball of aluminium foil (for creating rock 'texture')
hobby knife
pencil or marker (for tracing out design)
small sculpting tools or ballpoint pen (for carving design)
kitchen sponge
Trace your design our onto the foam using the pencil or marker (avoid permanent markers as the solvents in the ink can melt the foam), paying attention to the type of stone you are trying to represent. Are these blocks finely crafted by masons, or rough-hewn cobblestone? Have the rocks been recently laid down, or have they been sitting for centuries, slowly aged by the wind and rain? Have they been damaged by warfare or other sudden disasters? These questions can help to give character to your finished product, especially when you keep in mind that its often the imperfections and variance in design that will make your stone look realistic.

Once you've settled on your stone pattern, begin carving out the gaps between the individual stones. Though small carving tools can be found at your Local Gaming Store such as Jacks on Queen, a ballpoint pen is an excellent replacement if you don't have any handy at home. Pay special attention to widening the gaps where more than one rock edge meet, and experiment with how deep you carve them for added visual interest. If creating older/damaged stone, make sure to add in cracks to the occasion rock face. Note: if using foam insulation, it may be necessary to first cut along your rock pattern with a hobby knife before making the gaps deeper with your sculpting tool or ballpoint pen.

Now for the magic that turns these from obvious pieces of foam into stone! Grab a length of kitchen aluminium foil and roll it into a tight ball. Roll the ball of foil along the surface, being careful to change directions and amount of pressure applied so you don't end up with obvious patterns. By pressing into individual stones while applying more pressure, you can create further variance in stone surface depth, and will give your washes and highlighting techniques more opportunities to stand out.

Once you're happy with the look of your stone, now it's time to protect the delicate foam from the wear and tear of repeated gaming. Apply a thin layer of Mod Podge (tinted with black acrylic paint), being careful to get it into all the crevices of the foam, while not obscuring any of the finer details in the stone texture. Allow to dry completely (best if left overnight to cure fully) before proceeding with your painting.

Cover the entire surface of the stone with your base shade, even painting into the gaps between the stones. The most important part of this step is to thin your paints down with water before applying. It is not necessary to have the paint as watery as an ink wash, but if left as it comes out of the bottle all the work to create that amazing stone texture will be lost. Let dry completely.

With the kitchen sponge, apply the darker colour sparingly in a random pattern, eventually covering about 50-60% of the surface. When dipping the sponge in the paint, it is helpful to remove excess paint by pressing the sponge into paper tower lightly a couple times before moving on the the foam.

When dry, repeat the previous step with the lighter shade and once dry, the accent colour. You're aiming to cover about 40% of the surface. Make sure all paint layers are fully dry before moving on to the next step.

Choosing either a black or brown ink wash cover the entire surface, paying special attention to the gaps between the stones (and any depressions on the stone surface). If you want a larger stone you can leave the ink wash on the rest of the stone surface, or if you want a lighter effect brush off the excess was from the tops of the stones using a clear, dry brush. Allow ink wash to dry completely (including the gaps between the stones) before moving on to the next step.


While you could certainly leave the stones as-is at this point, adding home highlights or directional-lighting will add even more realism. Using the off-white (or white, if you want a colder effect), apply a small amount of paint to the brush and then remove most of it onto some kitchen paper towel. Starting at the top, gently drag the brush toward the bottom, applying a fine layer to only the top edges of each rock. The key is not to keep the effect subtle - a little truly goes a long way when you are using this drybrushing technique. You can always add another layer if it's not as light as you'd like, but it is very difficult (and would involve going through several steps again) to take some of the highlights away.
Once you've deemed your stones compete, don't forget that all-important matte sealant! Not only will it remove the not-so-realistic shine of the ink wash (unless you want your stones to look wet, but that is a topic for another time!), but will preserve the longevity of your terrain. A good rule to follow is to apply three thin coats, giving time for the sealant to dry fully in between applications.
And there you have it, realistic-looking stone! Try experimenting with different base and complementary colours to represent different types of stone (granite, sandstone, basalt, etc.); looking at images of real stone can help give lots of inspiration. If you'd like to take the weathering one step further, add some vines and plant overgrowth to the stone surface. Simply paint on lines of PVA glue (keeping to the deeper recesses between the rocks helps to make the effect more believable) and sprinkle on your flocking of choice!


Comments