Let's Build! Gypsy Vardos Pt 2 - The Paint
- Jack's on the Net

- Apr 25, 2020
- 4 min read
Written by Sarah-Anne
Part two of the creation of my Gypsy (Roma) Vardos; check out the build portion here!

Materials required:
foamcore (with the paper backing removed)
styrene sheets, in various thicknesses and textures
styrene tubes, in two different diameters
cardboard toilet paper or paper towel roll
PVA glue
thin plastic cement
super glue
Mod Podge Matte (tinted with black acrylic paint)
Mod Podge Gloss
White primer (spray can or air brush)
clear acrylic sheets (used for overhead projector slides, etc.)
Assorted acrylic paints
Dark brown and Sepia Ink Wash
matte spray sealant
artists pastels or weathering pigments, assorted browns
balsa wood strips (1/4" x 1/8")
Tools required:
hobby knife
Pencil/pen
Carving tools/cocktail toothpicks (plus a thin metal awl for texturing the styrene sheets)
Hobby snips/sprue cutters
Assorted paint brushes
sewing push pins

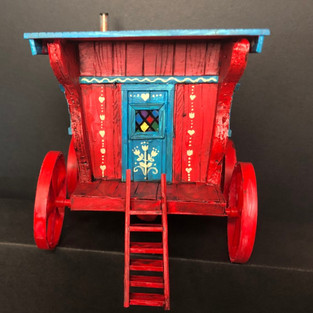
When we left off, we had the build portion of the vardos complete and now had to focus on adding some colour. I knew both had to have a large amount of red; a Google search led me to believe this was one of the most common colours used during the 19th and early 20th centuries, while also being a very auspicious colour in many other cultures around the world. Plus, I like red. It's a good colour, and I need all the cheering up right now I can find!

Once the main colour was applied I added accent colours that would compliment to red, while allowing each one to further stand out from one another. I really wanted to sell the idea that each vardo belonged to a different family, who had simply chosen to ravel together in the Badlands of Malifaux.

To add even more of a rainbow, I experimented with creating my very own leaded, multi-coloured windows. We had some leftover clear acrylic sheets, which I believe at one time would have been used for overhead projector slides. I first sprayed it will a layer of matte sealent - this is a trick I've used many times when I want to pain over an otherwise translucent plastic, without loosing the transparency of the rest of the object. Using non-diluted black acrylic paint, I created the vertical lines that would mimic the lead supporting each window pane. To keep them as straight as possible, I drew a grid on plain paper first, and kept it underneath the clear plastic as a guide.
Once dry, I used very watered down acrylic paint to create the various window glass, finding some colours took more than one layer to reach an even result. As an added surprise, I picked out the odd window pane and painted it a bright metallic gold. Once dry, I finished by adding a thin layer of Mod Podge Gloss to bring back the original shine. While these windows may look fully opaque, when held up to a light source they do let enough light through to sell the effect, and I was very excited to see how it all came together!

With more strips of styrene, I traced out the trim around each window and created a second layer that would fit on the top of the leaded glass, sandwiching it in securely. I made sure to appkly the same wood grain texture, and primed it white. I used super glue to attach the trim to the windows, and once dry it was simply a matter of carefully cutting the shapes out with a hobby knife.


I had actually affixed the windows to the vardos using super glue prior to starting the paint job, and covered over the glass portions with painters tape (as you can see in the previous photos) to ensure I didn't accidentally get paint on the glass. Once I moved on to the more delicate job of adding the detail work, I could remove the tape and carefully paint out the window trim.
I used real-world examples as the inspiration for the painted details, while keeping with the theme of bright, saturated colours. Once the details were dried, I brought out the subtle texture of the wood grain with a few coats of brown and sepia ink washes.


Though I was happy with the results at this point, I wasn't sure they would fit in with the grimy, gritty world of Malifaux, whose gaming tables would be their primary use. So using some artists' pastels (but weathering pigments would also work) in various shades of brown, I added weathering to anywhere I thought grit and grime would collect while on the road. I also painted out the spokes of the wheels to look like wood.


At this point I was ready to call them done! I am so excited to use these on the gaming table, and they are an absolute joy to look at. Though there are certainly areas I can improve upon next time, they are everything I was hoping for in this project, and more. I cannot wait to make a similar project again soon, and hope that this provides you with the inspiration to go create your own version of a Gypsy/Roma Vardo. If you do, please share your photos or tell us about them in the comments!


Comments